
Task Set 2: Using Zoom
The next thing you will want to do is get ready to meet with your students in an online format. Most in-person instructors will want to consider meeting students synchronously, having all of your students meet online at the same time. Synchronous online contact is the closest thing to meeting your students in an in-person class. Synchronous contact is not required by Wichita State, but even if you decide not to use it, the skills you will acquire in Task Set 2 will be useful to you. The goal of Task Set 2 is to get instructors the skills needed to deliver synchronous lectures and office/student hours.
Things to Do:
- In order to deliver synchronous lectures and offer online office/student hours, you will need to choose one of the many online meeting tools. Zoom is an easy tool to learn and to use, and basic accounts are free. These instructions cover Zoom basic accounts. If you already have a Zoom account, please skip to step #5. NOTE: your students do not need to get Zoom accounts in order to join your meetings. Since these instructions were originally written, Wichita State has begun offering Zoom Pro accounts free to anyone who has an instructional need. Please consult this Zoom Pro page for more information.
- First, you will need to install the Zoom application (app) on your computer. If you do not have "admin" rights to your Wichita State computer, you will need to contact the Help Desk by sending an email to helpdesk@wichita.edu. If you are an instructor in the College of Health Professions, please request assistance from your college directly by submitting a ticket. If you are installing the software yourself, please follow these installation instructions and make sure that you move on to the next page "Logging Into Zoom" as part of your initial download process.. You should install the "Zoom Client for Meetings." NOTE: you will have a Zoom basic account. For almost all uses, the free basic account is sufficient.
- Once you install the app, you will be prompted to login. Please follow these login instructions to login. NOTE: it is very important to follow these instructions rather than guess. This step is not intuitive.
- Once you have logged in, it's time to practice scheduling a meeting. Please follow these instructions to schedule a meeting.
- Now it is time to test your Zoom scheduling and meeting skills. Find a partner who
is willing to help you. Schedule a meeting and send your helper an email with the
meeting information. The best way to learn the Zoom application is to play with it.
NOTE: if at any time you "lose" the Zoom screen, don't worry. It has probably gotten
"behind" another open window on your desktop. Try minimizing the window that is covering
Zoom. Now, try completing these tasks:
- Have your partner join the meeting. If your default settings have not been altered,
your partner will not be able to join your meeting until after you have. You should
not have to do anything else to admit them. If you notice the “Manage Particiants”
icon in the menu ribbon at the bottom of your screen flash and turn orange when your
partner joins, it means your Waiting Room has been turned on. (Note: by default the
Waiting Room is turned off.) When the Waiting Room is turned on, you will need to
admit participants by clicking on the “Manage Participants” icon and then clicking
“Admit.” If you don't see the menu ribbon, it's only because it will "hide" when not
in use. Move your cursor across the Zoom screen and your menu ribbon will appear.

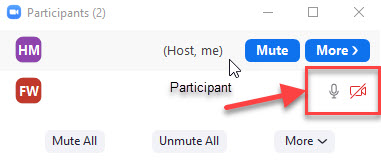
- Once you have someone else in your meeting, you will see their name listed on the
right-hand part of your screen. From there you can turn their microphone on or off
by toggling the microphone or video icon. Try this now. Can you hear your friend?
Can you see them? If you can't, make sure they don't have their camera covered, your
computer is not on mute, etc.
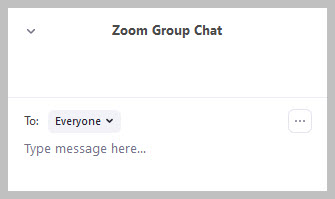
- Once you can hear and see your friend, practice writing to each other in the chat
function. You can locate the "Chat" in the menu ribbon at the bottom of your screen.
When you click "Chat" you will see the chat function at the bottom of the screen,
on the right. From there, you can type chat messages. NOTE: if you had more than one
attendee, you could choose to chat to one person directly, or you can chat to "everyone"
in the group by choosing who will see your chat with the drop-down arrow next to the
"To:" field.
- Now it is time to practice sharing your screen. You may want to bring up a PowerPoint
presentation so you have something to share. Once you have found something you want
to share, click the "Share Screen" icon in the menu ribbon at the bottom of your screen.
You will have a new window pop up, and it will show you all the available things you
could share with your participant. Choose something to share. When you are ready to
stop sharing, look to the very top of your screen where you will find a small button
called "Stop Share." If you can see color, you will notice that the button is red.
Click that button.


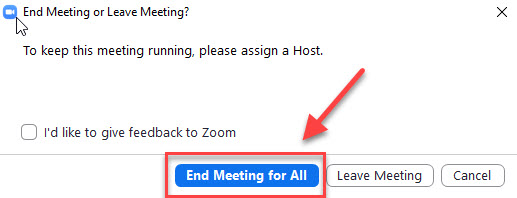
- There are other functionalities that you might want to explore next; that is up to
you. Play around. You can't "break" your Zoom meeting. Once you are finished looking
around, click the "End Meeting" link at the far right of the menu ribbon at the bottom
of your screen. NOTE: The "caption" function requires a live caption provider and
will not be useful to you unless you are working with the Office of Student Accommodations
and Testing in service of an active accommodation. If you have questions about serving
a particular student, please contact disability.services@wichita.edu.

- Have your partner join the meeting. If your default settings have not been altered,
your partner will not be able to join your meeting until after you have. You should
not have to do anything else to admit them. If you notice the “Manage Particiants”
icon in the menu ribbon at the bottom of your screen flash and turn orange when your
partner joins, it means your Waiting Room has been turned on. (Note: by default the
Waiting Room is turned off.) When the Waiting Room is turned on, you will need to
admit participants by clicking on the “Manage Participants” icon and then clicking
“Admit.” If you don't see the menu ribbon, it's only because it will "hide" when not
in use. Move your cursor across the Zoom screen and your menu ribbon will appear.
- Once you have some basic comfort with Zoom, you can schedule meetings, copy the invitation information, and send it to your students for class periods and/or office/student hours. A good way to get this information to your students is to post it in Blackboard as an announcement and then send the announcement out as an email. This skill is discussed in Task Set 1. Please practice regularly and help your friends practice too. The more you work with Zoom, the easier it will get for you.
- Once you start using Zoom with your students, you will find that it is much easier
to manage the Zoom session if you follow these guidelines:
- Start on time. Students will be confused and worried if the Zoom session starts late.
- Keep students' microphones and cameras turned off while you lecture. Turn microphones back on for open discussion. Only use cameras if you need to see each other as video will slow down your computer connection and may cause your meetings to have technical issues if you are on wifi or if your network connection is slow or overtaxed by heavy use in your neighborhood.
- While you lecture, designate one student to watch the chat window in case there are questions. Allow that student to keep their microphone turned on so they can alert you to a student question. This will take a little getting used to as the student may need to interrupt your lecture. You may want to practice this with your class before you begin your "real" lecture.
- You may want to record your Zoom sessions so they can be watched by students who could not attend the class session. To record, choose the "Record" icon in the ribbon menu at the bottom of your screen. NOTE: You should not put this recording directly into Blackboard as it will cause technical problems in your class. If you do plan to record your Zoom sessions for later use, please follow the directions for handling video that are outlined in Task Set Eight.