
Task Set 4: Adding Content
The bulk of any course is likely to be the content that you provide as the instructor. Content can come from a variety of sources, and for this task set we are going to focus on uploading or creating written lecture material and ensuring it is organized in a logical way. The goal of Task Set 4 is to help instructors feel comfortable in uploading and creating content in Blackboard.
Things to Do:
- This task set takes place in Blackboard and requires you to have a document (other than your syllabus) that you want to upload to your class. This document can be a handout, a typed lecture, or any other document you would like to distribute to students. If you do not yet have any documents to distribute to students, you can practice this task set with any digital document in .doc, .docx, .htm, or .PDF format. Please locate your document, login to Blackboard, and enter one of your classes.
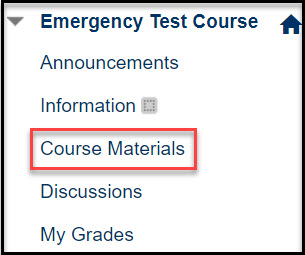
- In general, online course materials are organized in the Blackboard area called "Course
Materials." This is a different are from "Information," where files like your syllabus,
course schedule, and course policies are usually found. Since we are uploading a content
document, please click on "Course Materials" in the menu to the left in Blackboard.
NOTE: depending upon the size of your screen, you may not see the menu to the left.
It is there, and you can find it by mousing over the the edge of the screen just below
the "Create Announcement" button. When you see a small arrow pop up, click on that,
and your side menu should appear.
- Once in Course Materials, your first task is to create a folder structure for your
materials. It is important that you create folders for materials so you don't end
up with tens or even hundreds of files all listed together in a single area. For this
task, we are going to create two content folders so you can practice. To begin, ensure
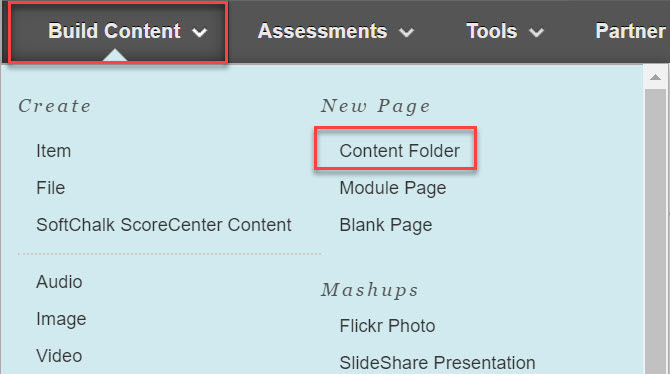
that your Edit Mode is in the ON position. Then mouse over the "Build Content" link
in the ribbon menu in the middle of the page. Click on "Content Folder," which can
be found in the right-hand column under the title "New Page."
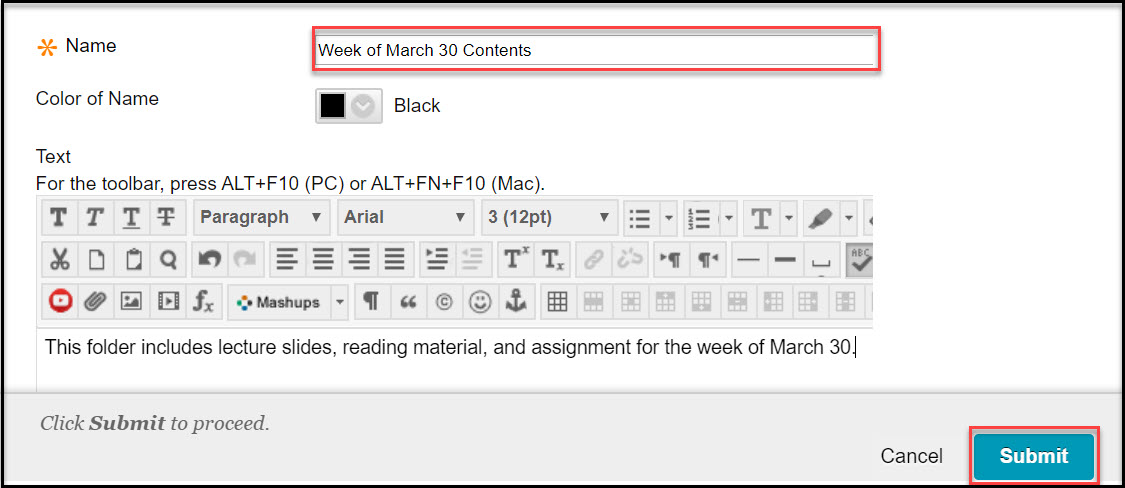
- Provide a name for your content folder. You can name it anything, but it is useful
to your students if you link the name of the folder to your content organization.
For example, you might call this folder "Module 1 Content" or perhaps "Week of March
30-April 5." Once you name your folder, put a short explanation of its contents in
the text box below and then click "Submit." You can leave the default settings as
you found them. Congratulations! You have created a content folder.
- Repeat the steps 3 and 4 and create a second content folder, but this time with a different name.
- You should now have two content folders showing up in your "Course Materials" area. If at any time you get lost, you can click on "Course Materials" again to return to these content folders. Sometimes instructors will create several content folders and then not like the order they are showing on the page. If you would like to move your second content folder to the top, all you need to do is to "grab" it by clicking and holding on the striped bar that is just to the left of the folder icon. You will see the bar show up if you mouse over it. Try reordering your folders now. You can use this same technique to reorder any items in Blackboard, including your announcements. NOTE: Sometimes this reorder function gets broken. If you can't get your files to reorder and stay the way you want them, please submit a OneStop ticket.
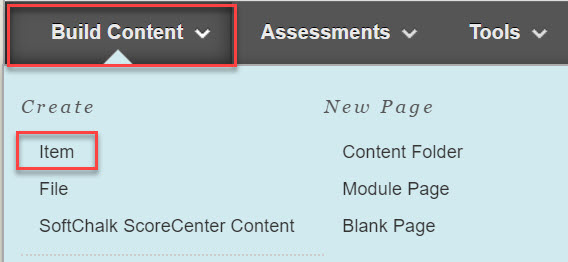
- Now that you have two folders and can reorder them, it is time to put content into
them. Click on the title of the folder you would like to put your content into. Once
you do that, you will see a new screen. Again, mouse over the "Build Content" link in the ribbon menu in the middle of the page. This time, you
are going to practice building an item. Choose "Item" in the left-hand column under
the word "Create." This should bring up the text editor. Again, start by giving your
content a title. Then you can type information about your file into the text editor.
If you are uploading a handout, for example, you can tell your students what it is
for and how it should be used.
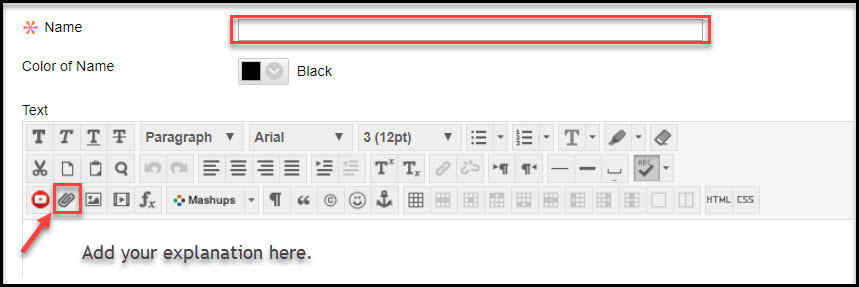
- Once you have provided a written explanation of your content, you can click the small "paperclip" icon in the tools ribbon in the text editor to add a file. If you do not see the paperclip icon, your tools bar is probably collapsed. Look to the far right of the tools ribbon in the text editor and click the icon that looks like two chevrons (two "down arrows"). That will expand your tools ribbon and you will be able to see your paperclip icon.
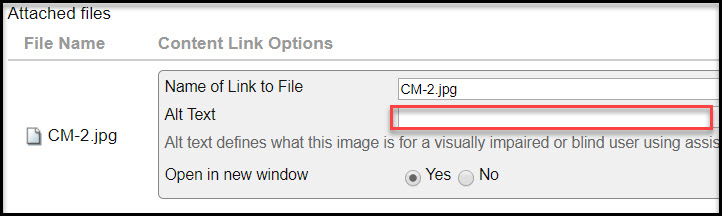
- After clicking the paperclip, choose the button named "Browse Computer" and find the
document you want to upload. If you want you can rename the link to the file (renaming
it will not change the file in any way, it just gives it a better name for your students
to see), then choose "Submit." NOTE: if you are uploading a picture file, you should
provide a brief description of the picture in the field called "Alt Text" before you
choose "Submit."
- You'll see a link to your file added into the text box. If you want, you can upload
several files into this same item. When you are finished adding a file or files to
this item, choose "Submit" on the Item. Congratulations! You have now learned how
to create an item with text, how to upload a file inside an item, and (if you uploaded
a picture) how to insert Alt Text!
- At this point, you may be wondering why you would want to upload a file this way when you used a slightly easier technique in Task Set 1. Well, the file upload tool that you learned earlier is useful but not as robust as the "Item" tool. You can use the Item tool for many things including providing a bulleted list of things to do, displaying a written lecture that you type directly into Blackboard, or uploading links to multiple files. You now have the skill set to do any of those tasks. We will return to the Item tool in Task Set 8 and explore it in greater detail. Knowing how to build a Folder and an Item in Blackboard provides you the foundation to do most of the other things you will want to do in the sytem. Take the time now to build any Content Folders you think you will need to get you to the end of the term and start populating them with content using the Item tool.