By default, when you create a form with OU's Form Asset builder, it will be a long sequence of fields with each element on its own line. It doesn't need to be.
In the form builder, there is a field labeled "Advanced." It can be used for a lot of things, and many are not well documented in other places. So let's go over how we can use them to do things such as these:
- Make subsections of the form
- Label the subsections
- Put form elements on the same row
- Style elements with classes
- Datasets for predefined items in some element types
The basics of "Advanced"
All advanced markings take the same form, which is this:
property=value;
Every property/value pair needs to be on one line and end with a semicolon.
Properties can start with one element and end with another element. So, for example, if you want to put some elements on the same row, you can say "this element starts a row" and then later on another element say "this element ends a row."
They are processed in order, so if you have one that starts something (A) and another that describes a thing (B) that is inside of A, the description needs to be after the start of the A and before the end of the A.
Ok. This is getting boring. Let's get to making stuff.
Subsections
A subsection of a form is also known as a "fieldset." To tell the form builder which elements need to be in a fieldset, you have to start and end your fieldset with the elements that go in it.
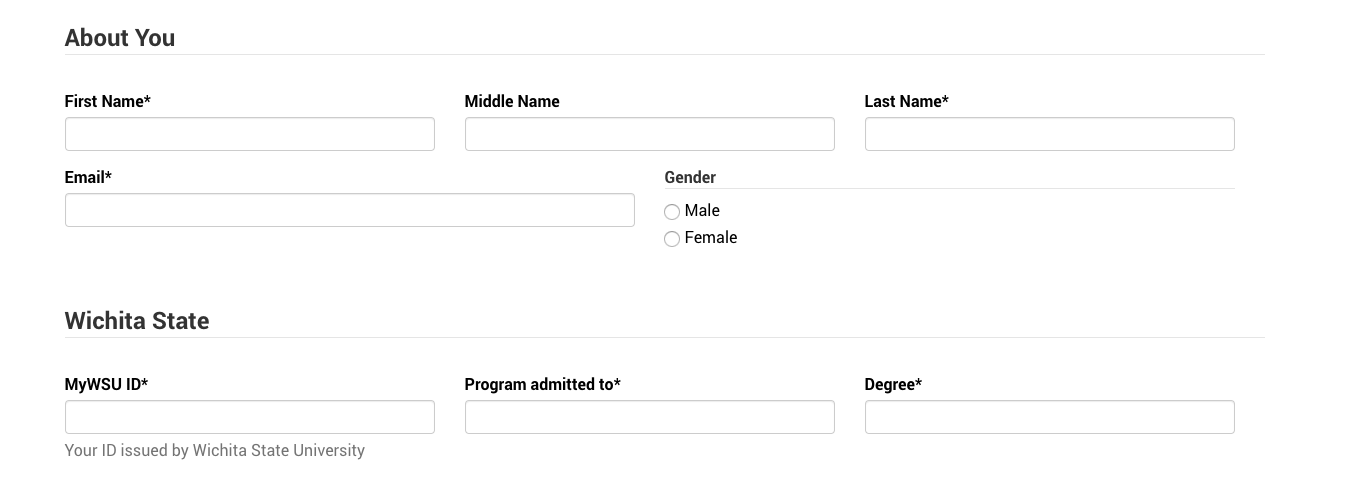
In the example at the top of this page, the first subsection starts with the "First Name" field and goes through to the "Gender" field.
The First Name field has in its "Advanced" section this marker:
fieldset_start=true;
The Gender fields has in its "Advanced" section this marker:
fieldset_end=true;
The fields in the middle (Middle Name, Last Name, Email) don't have anything relating to the fieldset in them.
Labels
Without specifying a label for the field set we just made, it would just add a little space but have no indication of what the grouping is about. To do that, we only need to add one property to one advanced field. In this case, we would put it in the "First Name" advanced field below the fieldset_start, because we need it to be inside the fieldset that we are labeling:
fieldset_start=true;
fieldset_label=About You;
Form Rows and Columns
Like fieldsets, we can start and end rows in the individual form elements, and we can also say things about the columns inside the rows.
In our example, we have on one row "First Name," "Middle Name," and "Last Name" and then on another row we have "Email" and "Gender."
So we need to add a start and also tell it how many columns are going to be in the row. The "First Name" element will now read like this:
fieldset_start=true;
fieldset_label=About You;
row_start=true;
row_col_count=3;
The "row_col_count" property needs to go in each element of the row, so "Middle Name" will now get its first (and only) advanced field:
row_col_count=3;
Now we need to end our row. And we need to also include that "row_col_count" in the final element so the form builder can process it properly. That also means that the "row_col_count" needs to go before the end, just like it came after the start in the first one. So now "Last Name" gets its first and only advanced markup:
row_col_count=3;
row_end=true;
We've now ended our first row, and to do the next row we have to do the same, but with only two elements. So the advanced field of "Email" would look like this:
row_start=true;
row_col_count=2;
Now, "Gender" ends both this row AND the fieldset, so it needs to have the row inside the fieldset. Putting all of this together, it now finally reads like this:
row_col_count=2;
row_end=true;
fieldset_end=true;
And from here you can repeat these steps for as many fieldsets and rows as you want. And remember, if you want an element to take a whole row, you don't have to do anything — that's the default.
Style Elements with Classes
There are many more attributes that one can control, but some are not recommended and others could better be labeled as "Really, really advanced."
One of the more simple advanced settings is "addclass" which would be used like this:
"addclass=someclass;"
That would produce a form element that had in its html something like <span class="someclass">...</span> around the element. Unless the css for that class has been defined somewhere, this probably isn't that useful to you. But if you know of a class that you want to utilize — say, "heading6" to make the type look bold and compressed — then you can do that.
Some of the available properties only work on certain form elements. For example, you can manually specify the width of a single-line text field with "size=10" (where 10 could be any number) and it would make the field that number of characters wide. But the default WSU field size will stretch it to 100% anyway, so you'd have to add a class (above) and write the css to override the default form field behavior. Which would be more than a little involved. But it's possible.
Likewise, the multi-line text field has available "cols" and "rows" to define its size. The cols set the width (based on average character widths) and the rows set the height (based on the number of lines of text). These also get handled roughly by our default CSS, though rows has more of an effect than cols.
Datasets
The final Advanced field that we will mention here is "dataset" which is used with the a radio button, checkbox, multi-line text, or dropdown elements. This is awesome for something that you need a lot but would really suck to type out. For example, a dropdown with an advanced field could be made like this:
dataset=state;
Then the dropdown would be all 50 states. Need the abbreviations?
dataset=state_ab;
The predefined datasets that OU built are these:
- state (full text states)
- state_ab (abbreviated states)
- country (full text of the nations of the world)
- year (A descending list of years from 2030 to 1900)
- month (A list of full text of months)
- alphabet (A-Z)
- numbers (1-100)
Some of the ones that we've built for WSU already are these:
- ugrad_majors (A list of the undergraduate majors)
- country_un (A list of countries in the Model UN)
- grad_year (A list of possible graduation years, descending from 2030 down to 1960)
- attitudes (Very Positive, Somewhat Positive, Neutral, etc ...)
- agree (Strongly Agree, Agree, Neutral, etc ...)
Only Level 10 administrators can create datasets. They add them to a file at "/_resources/xsl/_shared/datasets.xsl," which most users do not have access to edit. You will have to request a dataset with the websupport form if you want something else added. The proper format of a completed dataset looks like this (if you want to make it easy on us):
<xsl:when test="ou:get-adv($adv,'dataset') = 'alphabet'">A,B,C,D,E,F,G,H,I,J,K,L,M,N,O,P,Q,R,S,T,U,V,W,X,Y,Z</xsl:when>
Just name it by replacing the "alphabet" with whatever name and then the data is just a comma-separated list (NO SPACES after the commas) of values where the "A,B,C, ..." portion is.
If you want to set a default value to a dataset, just put "_D_" at the end of the option value. Like the country list defaults to "United States" because it's in the list as "...,United States_D_,.."