Setting Up Voicemail Management on the Web
How to complete the initial set up of Security Passcode and Name & Greeting Recording
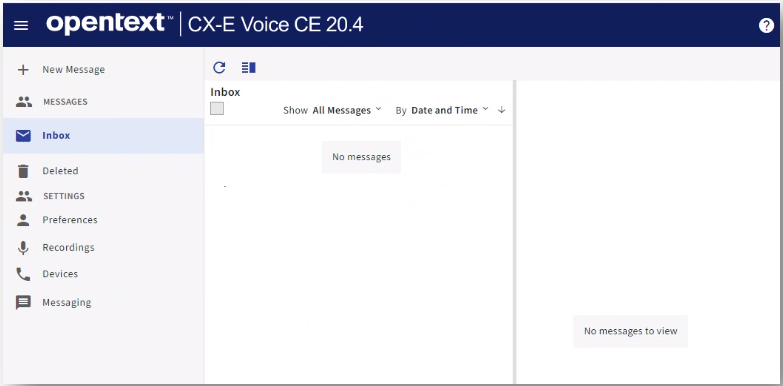
To set up your voicemail online:
- Open the web interface (you must be on campus or using the VPN)
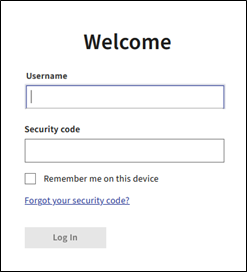
- Log inusing the following login options:
- Username:enter phone extension number (4 digits)
- Security Code:voicemail security code or password (For the initial setup, enter the security code assigned to you)
- Click Log In
-
You will be prompted to set up your account, click Let’s Go
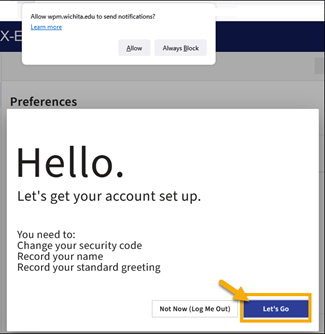
- Select Allow or Always Block on the pop up regarding notifications from Voicemail depending on your preference.
-
During setup, you will be prompted to change your Security Code.
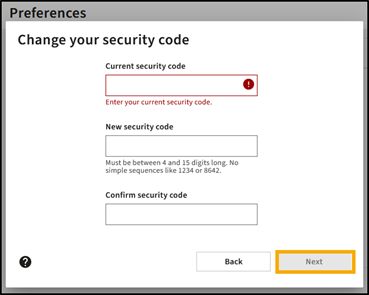
- Enterthe Current Security Code (assigned to you by Telecom)
- Enter a new Security Code(Must be between 4-15 digits long)
- Confirmthe new Security Code by re-enter the new code
- Click Next
-
Set Preferences for recording and playback - SelectPreferences and Click Next
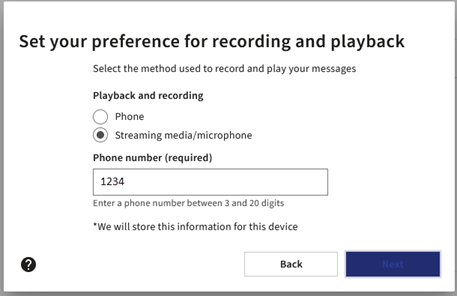
- You can change method used to record and play your messages by managing the settings
on this screen. By default, the phone number field will be populated with the primary
device assigned to you by your administrator.
- Phone -Allows you to record or play your messages using the phone indicated in the Phone number box.
- Streaming media / microphone - Allows you to record and play your messages through your laptop, tablet, or other Internet-connected device.
- You can change method used to record and play your messages by managing the settings
on this screen. By default, the phone number field will be populated with the primary
device assigned to you by your administrator.
- Record your name
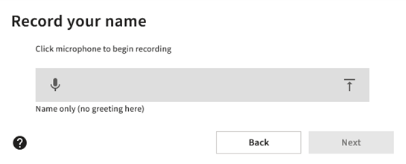
- Click the Microphone Icon
- Recordyour name
- Click square stop iconto stop recording

- Click the Playarrow to review the recording
- Repeat steps to re-record name
- Click Next
-
Record the Standard Greeting your callers hear
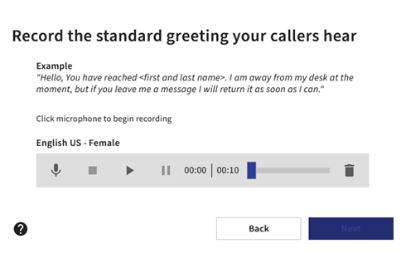
- Click the Microphone Icon
- Recordyour name
- Click square stop iconto stop recording
- Click the Playarrow to review the recording
- Repeat steps to re-record name
- Click Next

Preferences - Time zone & Display Language
- Select the default time zone
- Time Format can be set to either 12 or 24 hour format
- Select the User display language
Save after selecting preferred preferences.
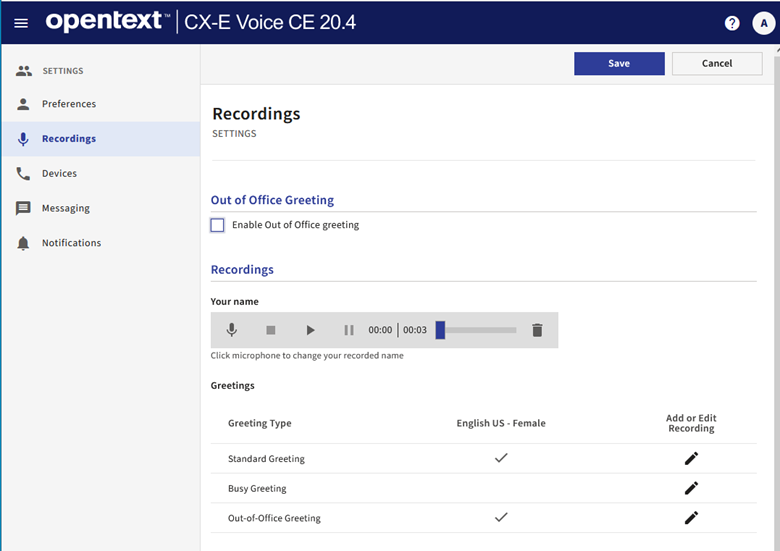
Recordings
- Enable Out of Office Greeting: Check to enable once Out of Office greeting is recorded
- Recordings – Type of Greetings: Standard, Busy, or Out of Office
- Click Pencil to Record or Edit Greeting
- Click the Microphone Icon
- Record your name
- Click square stop icon to stop recording
- Repeat steps to re-record greeting
- Click Save
- Click Pencil to Record or Edit Greeting
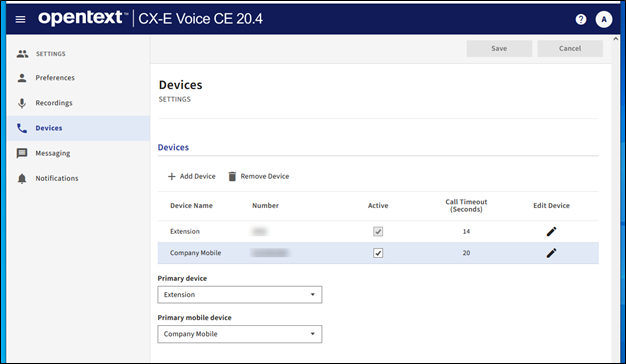
Devices

On the Devices page you can add or edit your devices and set the Primary device and the Primary mobile device if your administrator grants permission and provisions your account.
- Primary device- There can be only one primary device for the mailbox. This is the device to which the system attempts to transfer calls. When callers use the automated attendant to transfer to a user, they system always attempts a transfer to the primary device, regardless of which number the caller dialed.
- Primary mobile device- This number designates the device as the user's primary mobile device. Only one device can be designated as a primary mobile device.
Note: You can select a single device as both the primary and primary mobile device.
Add a New Device
- SelectAdd Device
- Device Type: select from the available options
-
Enter Device numberand select Activatethis number check box
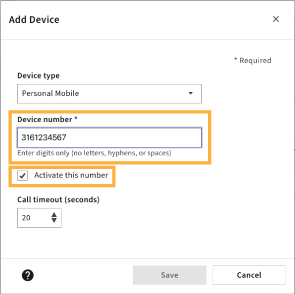
Use only numbers — no spaces, dashes or parenthesis. - Set the Call timeout(seconds) using the up or down arrows or enter a value with a minimum value of 5 and
maximum value of 60.
The Call Timeout default values vary by device type. Use the up/down arrows to change the Call Timeout from the current default setting. The call timeout parameter instructs the system how long to ring (in seconds) the selected device before considering it a RNA (ring no answer) condition. The timer starts when ringback is detected. - Select Save

Messaging
On the Messaging page you can configure and manage how the system plays the message envelope information and sorts your messages.
- The message envelope contains the sender’s information. Depending on your settings, it can include the sender’s name, date and time of the message.
- Playback options provide you with choices to sort by urgency, type or recency. You can also set your message playback speed by message or session.
After you choose your setting options, select Save to save your choices. To leave the page without saving and clear your choices, select Cancel.

Notifications
Outcall Notification
The Outcall Notification feature allows you to configure whether, and when, the system notifies you that new messages have arrived. You can also define your message notification delivery options. The Outcall Notification feature can contact regular phone numbers, digital pagers, PIN-based pagers, and radio pagers.
When your mailbox receives a message, the system determines whether to notify you based on the message type, message sender, and time of day you specify. If the message meets your requirements, then the Outcall Notification feature tries to notify you of the message by calling the first telephone number on your personal call list.