
Want to Build a Test in Blackboard?
Tests/quizzes can be created and administered in Blackboard. Use the training steps provided to guide your test creation process.
Step 1- Access the Tests, Surveys, and Pools tool:
Login to the course at Blackboard.wichita.edu.
In the navigation menu, expand the Control Panel and choose Course Tools, then scroll down.
Click on Tests, Surveys, and Pools.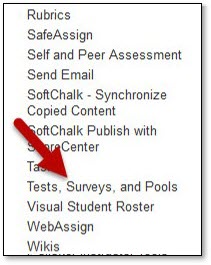
Step 2- Choose Tests/Quizzes, Surveys, or Pools:
Note: There are differences in how tests/quizzes, surveys, and pools are used. While the creation step for the individual questions is the same for tests, surveys, and pools, it is important to understand the differences to choose how best to proceed.
Choosing the Tests option will provide you two options, Build Test and Import Test. Importing a Test in Blackboard is reserved for when you have a formatted test file such as one obtained from a publisher
or created through Respondus Test Builder.
To build a test directly in Blackboard, click Build Test. 
The test directions and instructions are optional, but the test must be named.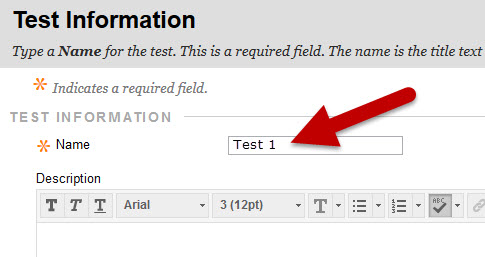
Click Submit when you are finished to open the Test Canvas and create the test contents.
Step 3- Create Your Questions:
A Test Canvas page will open with options to Create Question, Reuse Question, or Upload Question. Click the Create Question button opening a dropdown menu of question types. Select the question type you want to create. There are many questions types you can choose. If you have questions about how to
set up a particular type of question, please email us: OIR@wichita.edu. This training will go over the most common types of questions: Multiple Choice,
True/False, Fill-in-the-blank, and essay/short answer.
Select the question type you want to create. There are many questions types you can choose. If you have questions about how to
set up a particular type of question, please email us: OIR@wichita.edu. This training will go over the most common types of questions: Multiple Choice,
True/False, Fill-in-the-blank, and essay/short answer.
Under the question heading, Enter an optional Question Title. Then Enter the question text into the Text box.
Adjust the question Options in the Options section. You can change how the answer choices appear (numbers, letters,
vertically, or horizontally); if learners are able to receive partial credit (mostly
for multiple answer question types); and choose for answer options to be displayed
in a random order. Note: If you choose for answers to display in a random order, please ensure that the
answer options do not include order-dependent choices, such as "Both A and B," "Both
A and C,"...etc. as these may lead to confusion for students.
Note: If you choose for answers to display in a random order, please ensure that the
answer options do not include order-dependent choices, such as "Both A and B," "Both
A and C,"...etc. as these may lead to confusion for students.
Next input the Answers. Each answer option should be entered into it's own text box. Blackboard will default
to provide 4 answer text boxes. You can change the Number of Answers to increase the
answer options, or you can use the Remove button to subtract the number of possible
answers. Finally, select the radio button to the left of the correct answer. Otherwise, Answer 1 will be selected by default.
 The Feedback section allows for a response to students for both the correct and incorrect answer.
 Select Cancel, Submit and Create Another, or Submit. If you use the Submit and Create Another option, Blackboard will open a clean creation
page of the same type you have just saved. To create a different type of question
or if you do not want to create any additional questions, click Submit and proceed to next steps.
Select Cancel, Submit and Create Another, or Submit. If you use the Submit and Create Another option, Blackboard will open a clean creation
page of the same type you have just saved. To create a different type of question
or if you do not want to create any additional questions, click Submit and proceed to next steps.
Under the question heading, Enter an optional Question Title. Then Enter the question text into the Text box.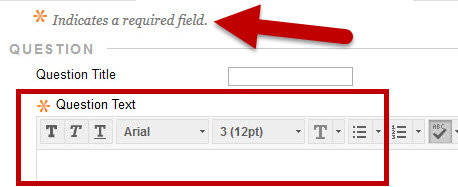 Under the Options section, you can change answer orientation display between vertical
and horizontal using the dropdown arrow.
Under the Options section, you can change answer orientation display between vertical
and horizontal using the dropdown arrow.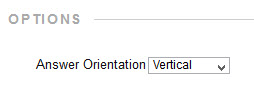 Select the radio button to the left of the correct answer. Otherwise, "True" will be selected by default.
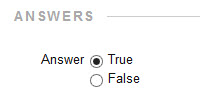 The Feedback section allows for a response to students for both the correct and incorrect answer.Select Cancel, Submit and Create Another, or Submit. If you use the Submit and Create Another option, Blackboard will open a clean creation
page of the same type you have just saved. To create a different type of question
or if you do not want to create any additional questions, click Submit and proceed to next steps.
The Feedback section allows for a response to students for both the correct and incorrect answer.Select Cancel, Submit and Create Another, or Submit. If you use the Submit and Create Another option, Blackboard will open a clean creation
page of the same type you have just saved. To create a different type of question
or if you do not want to create any additional questions, click Submit and proceed to next steps.
Under the question heading, Enter an optional Question Title. Then Enter the question text into the Text box.
Next, use the answer text box to type in the accepted answer. You can choose to list the answer as case sensitive using the selection box to the
right if desired. ![]()
If you will accept multiple answers, you will need to add "answers" options using the dropdown arrow and provide one acceptable answer per box. The Feedback section allows for a response to students for both the correct and incorrect answer.Select Cancel, Submit and Create Another, or Submit. If you use the Submit and Create Another option, Blackboard will open a clean creation
page of the same type you have just saved. To create a different type of question
or if you do not want to create any additional questions, click Submit and proceed to next steps.
The Feedback section allows for a response to students for both the correct and incorrect answer.Select Cancel, Submit and Create Another, or Submit. If you use the Submit and Create Another option, Blackboard will open a clean creation
page of the same type you have just saved. To create a different type of question
or if you do not want to create any additional questions, click Submit and proceed to next steps.
Under the question heading, Enter an optional Question Title. Then Enter the question text into the Text box. This information provides instructions to students on how they should match the pairs.
Next, indicate whether partial credit is acceptable--this would mean partial points can be earned for correctly matching only some of the pairs.

Then, create your matching pairs using the "question" and "answer" text boxes.

Please note, that you will have the chance to reuse an "answer" for other pairs if needed.

When you are finished creating question and answer pairs, you can also add any "unmatched" answer options you would like. These answer options would display to students as potential answer
choices, but are incorrect as they do not have a match.![]()
Be sure to also select the order you would like answers to populate. You can choose to display answer options in order or in a random order.
The Feedback section allows for a response to students for both the correct and incorrect answer.Finally, select Cancel, Submit and Create Another, or Submit. If you use the Submit and Create Another option, Blackboard will open a clean creation
page of the same type you have just saved. To create a different type of question
or if you do not want to create any additional questions, click Submit and proceed to next steps.
Under the question heading, Enter an optional Question Title. Then Enter the question text into the Text box.*Note: If you are creating a Short Answer question, you can also change how many rows
display for students to begin writing their response.
If you would like to add an example of a correct response, you can do so in the Answers area. It is not required to provide an example answer. Next, you can also associate a Rubric to the question to provide grading criteria information to students and to aid in
the grading process.
Next, you can also associate a Rubric to the question to provide grading criteria information to students and to aid in
the grading process. Finally, provide instructor feedback or select Cancel, Submit and Create Another, or Submit. If you use the Submit and Create Another option, Blackboard will open a clean creation
page of the same type you have just saved. To create a different type of question
or if you do not want to create any additional questions, click Submit and proceed to next steps.
Finally, provide instructor feedback or select Cancel, Submit and Create Another, or Submit. If you use the Submit and Create Another option, Blackboard will open a clean creation
page of the same type you have just saved. To create a different type of question
or if you do not want to create any additional questions, click Submit and proceed to next steps.
Step 4- Check and Adjust Points Per Question:
Now that you have created test questions, you may need to adjust the points possible for each question.
To change the points for an individual question, click on the points associated with the question and the editing feature will open. To change the points for multiple questions at once, click on the select box next to the questions that need adjusted.
Next, use the Points Updating option towards the top of the questions list and select Update. 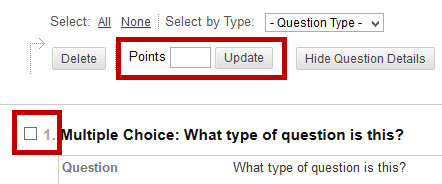
Step 5- Check Your Total Questions and Points
When you are finished creating questions and adjusting points, check the total number of questions and points in the overview at the top of the page.
You are now ready to deploy your test and adjust the test settings.