
Test Settings in Blackboard
Step 1- Access the Test Options Page
If you have just deployed your test, you will be automatically directed to the Test Settings page--or as Blackboard refers to it, "Test Options". You can also access the page at a later date to provide an exception for individual students or to adjust some of your test settings down the road if needed.
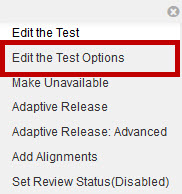
Use the dropdown arrow next to the test link in your course and select Edit the Test
Options.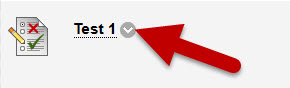
Step 2- Review and Adjust Your Test Settings
There are many areas of the Test Options page to review and it is important that each section be considered carefully before moving on.
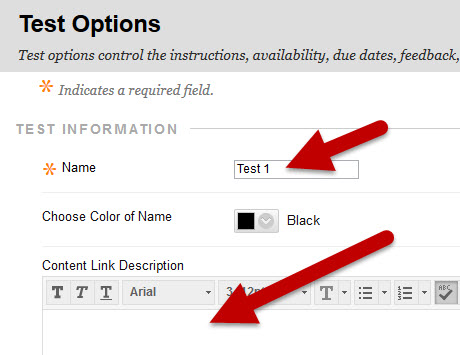
- Test Information: In this section you will provide a name for the test. This is the name that will display to students in the content area. You can also provide a description, and determine if the test will open in the current window or a new window.
*Test Information: In this section you will provide a name for the test. This is the name that will display to students in the content area. You can also provide a description, and determine if the test will open in the current window or a new window.
Option 1-- Test Link Name and Description:
Enter a name for the test, in the Name text box and include a description under Content Link Description to appear with the test link in the content area. To allow students to read the test description before they begin the test, check the box you see under the test description box.
Option 2-- Set the test to open in a New Window:
You can also choose to set the test to open in a new window/tab or in the same window/tab as the current Blackboard page. It is recommended that this setting be kept in the default position to open the test in the current window.

- Test Availability: These options work similarly to assignments availability options – the test can be made available or unavailable, availability times/dates can be added, the number of attempts can be determined, the test can be timed or not, and a password can be required of students to access the test.
Option 1-- Make the test available to students:
This is an essential setting. Use the radio button next to the to select the option for "Yes".
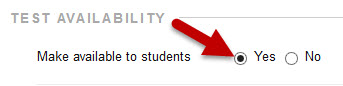
The default position is set to "No". If this setting is not switched to the "Yes" position, the test will never be displayed for students to access.
Option 2-- Add a New Announcement for this test:
The default setting selected is "No". If you choose to create an announcement for
this test, a new announcement will be created in the Announcements area of the course,
indicating that the test is available for students.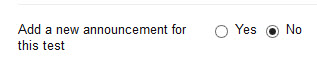 Option 3-- Set the number of attempts a student is provided:
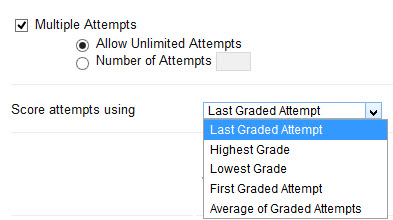
By default, all students are provided a single attempt at the test. If you would like to provide students a set number of multiple attempts, select the option and type in the number of attempts that students are allowed. You can also set the number of attempts to unlimited.
Once you have selected the multiple attempt option you want, you can change which attempt will be entered into the Grade Center and apply to the student's final grade. Again, by default, the option selected will be Last Graded Attempt.
Option 4-- Force Completion:
This is a critical setting and it is highly recommended that this setting be kept
in the "unchecked" position.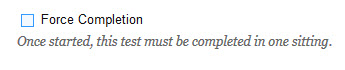 This setting will force students to complete the test in a single setting. While this
sounds ideal to help prevent cheating or searching for answers "off the clock", this
setting often causes problems simply due to technical issues. If a student's internet
connection flickers out for even a few seconds, the test can and will auto-submit
for them. Once a test is submitted, there is no way to re-open that attempt. This
then creates extra work and anxiety for the test taker and the instructor to remedy
the problem.
This setting will force students to complete the test in a single setting. While this
sounds ideal to help prevent cheating or searching for answers "off the clock", this
setting often causes problems simply due to technical issues. If a student's internet
connection flickers out for even a few seconds, the test can and will auto-submit
for them. Once a test is submitted, there is no way to re-open that attempt. This
then creates extra work and anxiety for the test taker and the instructor to remedy
the problem.
Option 5-- Test Timer:
The test timer allows you to enter a specific amount of time, in minutes, that students
are allowed to take the exam once they begin. The timer runs in real time and does
not pause or stop if a student navigates away from the test.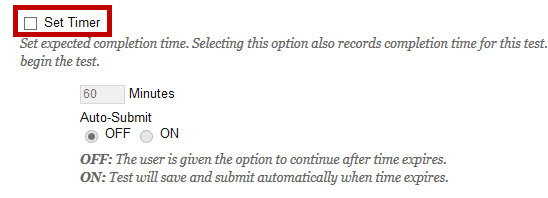 You can select auto-submit "on"--which will submit the exam for the student automatically when the test timer runs
out. If auto-submit is not turned on, students are informed that their time has expired,
but are given a choice to continue the exam.
You can select auto-submit "on"--which will submit the exam for the student automatically when the test timer runs
out. If auto-submit is not turned on, students are informed that their time has expired,
but are given a choice to continue the exam.
Option 6-- Display Dates:
The display dates allow you set a specific date and time for the test to be available
to students. The display after date indicates when the test will become available,
and the display until date indicates when the test will become unavailable. You can
manually enter the date and time or use the icons next to each box to select from
the calendar and time listings.
Option 7-- Password:
Last in the Test Availability section is the option to include a password to the test.
This will require students to enter the password, exactly as you have typed it, in
order to access the exam. Please note, you will need to provide the password to students
exactly as you have included it. Passwords are case sensitive. 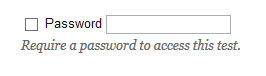
- Test Availability Exceptions: This section allows you to give different test access to individuals or groups of students based on their needs such as multiple attempts, different availability dates, or extended time to complete the a test.
Option 1-- Add a Test Exception:
This option allows instructors to provide individual test settings for a singel student or groups of students. This is helpful when a student needs to make up an exam or for students who have accommodations with the Office of Student Accommodations and Testing.
Click on Add User or Group button.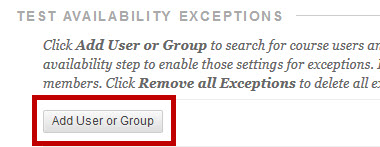
Another window will appear with a list of students in the course. Select the student from the list provided and click Submit.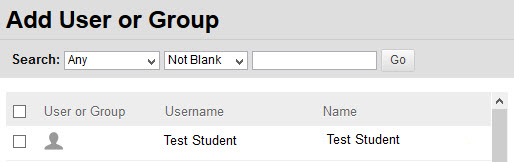
Adjust the number of attempts the individual student is provided, the test timer and
auto-submit, and the availability dates via the calendar icon.
- Due Date: In this section you can enter the test due date and determine if students are allowed to attempt the exam once the due date has passed.
Option 1-- Set a Due Date:
If you do not want students attempting the test after your provided due date, you
can add the date and time to Blackboard and check the box for “Do not allow students to start the Test if the due date has passed.” This will hide the test from students’ view after the due date has passed.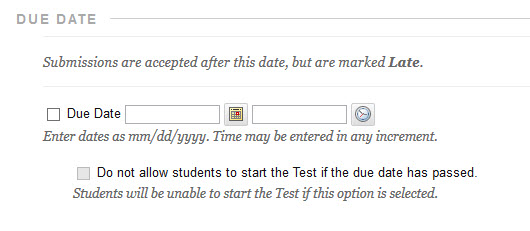 Alternatively, not checking the box for “Do not allow students to start the Test if the due date has passed.” will still allow students to attempt and submit their exam, but it will require your
approval before the grade is entered into the Grade Center. Exams listed as "late"
will be listed in your Needs Graded area.
Alternatively, not checking the box for “Do not allow students to start the Test if the due date has passed.” will still allow students to attempt and submit their exam, but it will require your
approval before the grade is entered into the Grade Center. Exams listed as "late"
will be listed in your Needs Graded area.
*Please note: If you have “Do not allow students to start the Test if the due date has passed.” marked on, test exceptions adjusting date availability will still be subject to the Due Date restriction. If someone needs time beyond the associated due date, you will need to unmark the "Do not allow students to start the Test if the due date has passed" setting.
- Self-Assessment Options: There are two options in this area: to include or to hide the scores in the Grade Center. Note: Please review these options very carefully. If the score is included in the Grade Center after it was hidden, all prior attempts will be deleted.
Option 1-- Including the Test Score into Grade Center Calculations:
This section gives you the option to include the test scores into the Grade Center
calculations or use the tests purely as a self-assessment that does not impact the
student's final grades.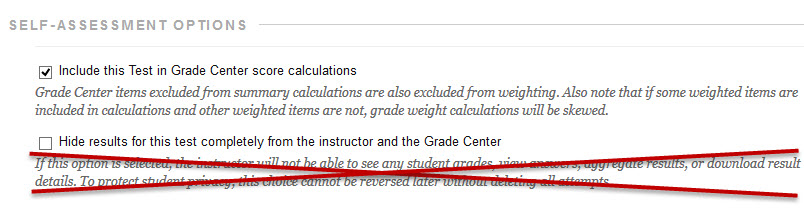
Additionally, there is an option to "Hide results for this test completely from the instructor and the Grade Center." This option is not recommended as the instructor will not be able to see any student grades, view answers, aggregate results, or download result details. This choice cannot be reversed later without deleting all attempts.
- Test Results and Feedback to Students: This section deteremines what students see after a test such as when they see results, if they see the score per question, if they see either all, correct, or submitted answers, and if they can view instructor feedback.
Option 1-- Showing Test Results and Feedback to Students
This section deteremines what students see after a test.
Use the selection boxes and dropdown menus to choose when students can see results, if they see the score per question, if they see all,
correct, and/or submitted answers. Additionally, if feedback for correct or incorrect
answers was included when the test was created, you can select to show the feedback
in this section. The last selection is to show incorrect answers.
- Test Presentation: In this final section, you can select how the test questions will display to students during the exam.
Option 1-- Select How Questions Will Display to Students During the Exam
Use the selection boxes to choose how questions will show to students. You can choose All at Once or One at a Time; and can also choose to Randomize Questions for each test attempt.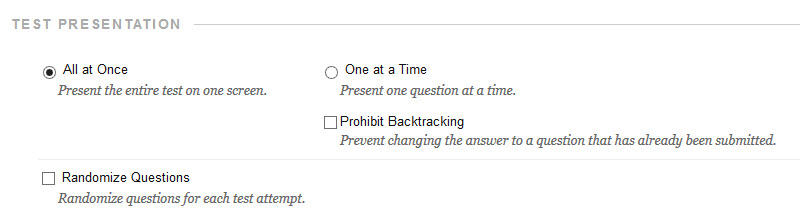
Step 3- Finalize Your Test Settings and Submit
Once you have finished reviewing and adjusting all settings, click Submit and the test is ready for students. Please note, if you need to adjust your settings later, you can always do so by using the Edit the Test Options steps listed in the beginning of this training.