Sharing Your Video in Your Course
Now that all your hard work is complete, and you have finished editing your recording, it is time to share your video. There are multiple ways to share your video in Blackboard.
1- Share Using the Panopto Video Link tool
Before you can use the Panopto Video Link tool, you will need to ensure that you have properly configured your course for access to the folder that your video is located in. For training on configuring or re-configuring, please use our other IDA training pages.
Start by going to your Blackboard course and navigating to the location in your course where you want your video to be located. For example: “Course Content,” “Information,” “Module 2,” etc.
Select the “Tools” dropdown at the top of your content area. Then select “Panopto Video Link.”
*Important Note: If you have a quiz embedded in your video that you want to be used for points, you will need to use the Panopto Quiz tool instead of the Panopto Video link tool.

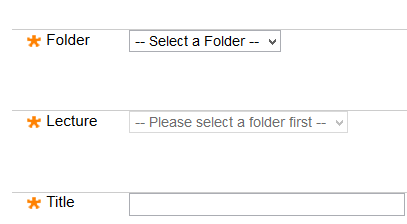
The “Insert Panopto Video” screen appears. Use the dropdown to select the correct
folder where your video is stored.
Once you select the folder that contains your recorded videos, the “lecture” dropdown will be available to locate the correct recording.
Finally you can keep the title or change it, and provide an additional description for the video if needed.
When finished, select “Submit.” Your video will now be available to students in the selected course content area as
a Panopto link.
2- Share Video Using as a Web Link
Start by going to panopto and navigating to the folder that holds your video. Hover your mouse over the video and additional options for settings, share, edit, and delete will appear.
Select Share and the Share settings window will open. Next, link inside the box at the top that lists the video URL (link).

Copy the link using keyboard shortcuts or right-click the mouse and selecting copy.
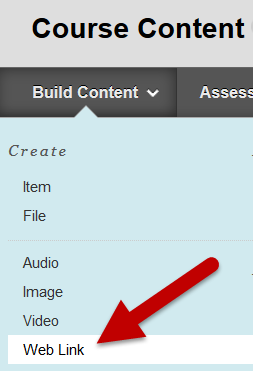
Next, navigate to your Blackboard course and go to the location in your course where you want your video to be located. For example: “Course Content,” “Information,” “Module 2,” etc.
Select "Build Content" and "Web Link".
In the Web Link creation page, paste the link into the URL textbox and provide a name
for the video.
Lastly, click submit.
It is important to know that in order for users to be able to view the video using the link, you will need to change the "Who has access" setting to "Anyone at your organization with the link" or ensure that the course has been properly configured.
*Please note, there are three very similar share options. Any of these options is acceptable for videos that do not include protected student information.
- "Anyone at your organization with the link" requires that users be logged in with WSU credentials and have the specific video link in order for them to be able to view the video.
- "Anyone at your organization" only requires that the user be logged into Panopto with their WSU credentials. They may then find the video through our WSU Panopto site, without being specifically given the link.
- "Anyone with the link" only requires that the user has the link. This does not require the user to log in, meaning the video could be shared with individuals outside of WSU.

